Showing posts with label cookies. Show all posts

Sunday, June 15, 2014

S'Mores bar - pump up your S'Mores

For my 30th birthday we had just purchased our first home and we had a birthday party in our back yard.  We live in the country.  Between the land that we own and the land that surrounds us, we have about 70 acres of vacant land.  My birthday is in August.  What did we do?  You betcha'!  We had a giant bonfire.


What better summer event than sitting around a fire with good friends, good drinks (of course) and good laughter and talk?

Of course, if you're having a bonfire, you must have S'mores!


One of our friends set up a "s'mores assembly line," which was all well and good, until someone bumped the log that all the ingredients were on and dumped them into the fire.  It was all good and served as a good laugh for the night and stories for years to come.  It is a birthday I'll never forget.

You don't need a party to have S'mores.  Any fire night is a good night to roast some marshmallows.  It always brings back memories of our group camping adventures when I was a kid.

Instead of sticking with the traditional S'mores, why not set up a S'mores bar?  Allow everyone to make their own creation?

You can buy different flavor variations of marshmallows, but you can really get creative with the other ingredients.

Varieties of chocolate

Toffee
Peanut butter cups
Caramel filled
Peppermint patties
If you like nuts, use a chocolate with nuts in it, or a candy like Turtles
Miniature candy bars instead of plain chocolate

Cookies instead of graham crackers

Fudge stripe cookies
Peanut butter cookies
Chocolate chip cookies
Pull out some of the Girl Scout cookies you bought!!
Snickerdoodles
Gingersnaps
Oatmeal raisin
If you want more gooey insides, split an Oreo or Nutter Butter, or other similar sandwich cookie open, and place your chocolate and marshmallow between them.

Get creative with your combination and see what you can come up with.  Report back with what your favorite is/was.

Saturday, April 20, 2013

Product Review - Immaculate Baking

I discovered this brand purely by accident.  My family loves carbs.

I needed a quick breakfast items.  While I was checking out the canned cinnamon rolls (yes, I know they're unhealthy) I found these.  The brand is Immaculate Baking.


I happily bought them when I saw the label.  No bleached flour, no high fructose corn syrup, organic and non GMO (genetically modified).  A convenience food that I could feel good about serving to my daughter.  Double bonus, she LOVED them.  We also blueberry and cinnamon rolls.

Triple bonus, I found out they have gluten free products as well.


I found this cookie dough when I was picking up some more breakfast food for the kiddo.  They had this Fudge Brownie and Chocolate chip.  The chocolate chip is OK, but these are just fantastic.  There is no way to tell they are gluten free.

It's so rare to find a brand that is healthy, convenient, and better yet, affordable.  Yes, they are pricier than other brands, but I'll pay the little bit extra to feed my family some healthy food.

Most of the time I do my own baking, but when I don't have time.  It's nice to know I have an alternative.

I found these in the refrigerator section at a Super Walmart.  I haven't really looked other places for them.  You can also like them on Facebook.

Thursday, February 2, 2012

Blogs I like


I was very honored to have this blog nominated by a friend of mine.  We became friends in 1993 when I moved to Houston for a job.  We became friends instantly  and have been ever since, even though we haven't seen each other since 1996.

The rules are simple:

1) Thank the person who gave you the award
2) Link back to their blog
3) Add an image of the award on your blog in the sidebar if you can
3) Choose blogs/bloggers you enjoy and nominate them by listing their blog
and letting them know in one of their comments
4) List 7 random things about yourself


Sounds like fun, so here we go!

I love my friend's blog so he gets the first shout out and a big thanks!!.  

Two Men and a Little Farm - This is a fun blog about 2 men who live in the city, but have bought country property and are fixing up an old farmhouse.  The blog talks about everything from cooking, decorating, and landscaping to highlighting vintage posters and other items from the era of the house.  I love being able to watch the progress of my friend's dream home from more than 1000 miles away!

Since I love baking some of these are not going to come as a surprise.

Cake Wrecks - This blog makes me laugh out loud most days.  It is professional cakes that have gone horribly wrong.  On Sundays they feature the most beautiful cakes you have ever seen.  Jen and John who write the blog have a very twisted sense of humor.  The commentary on the cakes is often more funny than the cakes themselves!

The Sweet Adventures of Sugarbelle - Her cookies are amazing, but she offers amazing tutorials as well to teach aspiring cookie makers how to create the beautiful confections.  The cookies she creates are pure works of art!

Cupcakes Take the Cake - Adorable cupcakes and tutorials!!

Rollin in Dough - Another awesome cookie artist.  

I could go on and on and on about baking websites and I could spend all day just going through them for inspiration.

On to the other part of my life.... kids and trauma.  

Attachment & Trauma Network - This is the group I volunteer for.  We parents supporting and educating other parents who parent children with attachment issues and a trauma history.  Most often severe abuse and neglect.  The majority of the families that we work with have foster or adopted children.  The blogs are sporadic right now, but are a focus of areas we can improve on and reach out to the public.  

And for the last part... 7 random things about myself.

I hate snakes.

I have always loved to bake and learned from my great-grandmother.

There are 2 children that no longer live in my home, but will live in my heart forever.

I'm an old fashioned romantic at heart.  

My favorite color is pink.

I love high heeled shoes!!!

I have 3 friends that have been my friends since high school.  One of those goes back to elementary school.  Mel, Shel and Deb, you rock!

Check out the blogs I listed. If you have others that you like, let us know about them!

Friday, September 9, 2011

Cookie Decorating - 101

You want to make pretty cookies, but you can never get your icing nice and smooth.  Well, that's because cookie decorators don't use old fashioned butter cream icing.  We use something called Royal Icing.  It's a very simple recipe, but it gives great results.

1 egg white (if you don't want to use an egg white you can use 3 T meringue powder)
4 C powdered sugar
ABOUT 1 - 2 T water

Mix the egg white and the powdered sugar, then add the water gradually to get the consistency you want.

It's that simple.  I actually use lemon juice instead of water to give a little more flavor to my icing.  If you use vanilla, it will tint your icing and it won't be white.  Lemon juice doesn't have that issue.

So, why use royal icing.  It gives a nice smooth canvas to decorate on, and the big thing, it dries "hard" so that you can stack cookies, unlike buttercream icing.

The procedure with royal icing is slightly different as well.

To start with, you want a stiffer icing because this is going to be your edge and what holds the next step together.  This should be about the consistency of toothpaste, or a little bit thicker, but you don't want to have to squeeze too hard to get it out.


If you're not going to be doing a lot of decorating, buy a set of disposable bags from a company like Wilton.  You can find the bags in craft stores in the cake decorating section.  You can also find them at Walmart.  Or you can use a plain old zip top bag.

There are a couple of ways to use these.  You can cut a small hole in the corner of the bag and use that, or you can buy tips, again, from craft stores or Walmart.  If you're lucky enough to live near a cake or cookie decorating store, you can find all kinds of neat tools.  You can also drop the tip into the bag and use it that way, or you can use a coupler.  With these the wider part goes into the bag, just cut the opening a little bigger so that the end comes out of the hole.  Then attach your tip and screw the ring on. This allows you to change tips without having to empty the bag.


This is what it looks like when it's put together.

Now outline your cookie.


Let this dry for a little bit.  This is the border that's going to hold in the next step, the flood icing.

To make flood icing, take your regular icing and add a little bit more liquid too it.  You want it about the consistency of glue so that it flows easily, but not too liquidy.

Squeeze this onto your cookie.  You don't need to totally fill the cookie with the icing, and if you do, you run the risk of it overflowing.


Next you take a toothpick, or something similar and spread the flood icing.  It will flow somewhat on it's own, but spread it into the corners and up against the edge, unless you want to leave a gap.


Let these dry, preferably overnight.  You will now have a nice blank canvas to add any details you want to. If you don't wait long enough, the designs and colors can bleed into each other.  Sometimes you want to do this on purpose, like I did with my tie dye cookie.


You can add coloring at any point in time.  My personal preference is Americolor.  I prefer them over Wilton for several reasons.  The colors are incredibly concentrated so you don't need as much.  These come in a squeeze bottle so it's easier to control the color, rather than Wilton where it's in a little jar and you have to scoop it out or dip something into it, then dip that into your icing.  I have had the caps on the Wilton bottles crack, or the jars leak, which leaves a giant mess.

Whatever you choose to do, have fun with it.  There are so many fun cookie cutters available now, and the only limit is your creativity.  If you want to see what I mean, check out some amazing cookie decorators.  SweetopiaJP Creatibles, and Sugar Belle are amazing blogs and the detail they put in their cookies is beyond description.  They are true cookie artists.

You can also check out my photos on my Facebook page.  I'm a work in progress, but it might give you some ideas or inspiration.

Wednesday, September 7, 2011

Sugar Cookies 101

I often get questions about the recipe for my sugar cookies aka: cut out cookies.  It's really a simple recipe.  I'll even share a few secrets with you.

Basic sugar cookies

3/4 C butter - room temperature
1 C sugar
2 eggs
1 tsp vanilla or other flavoring
2 1/2 C flour
1 tsp baking powder

That's it.  That's the whole list of ingredients.  About the flavoring..... I use vanilla.  You can use almond extract, rum extract, lemon juice, all sorts of things.  I use vanilla because everyone loves vanilla, it doesn't conflict with the icing (I'll put the icing in another post) and I don't have to worry about nut allergies like when using almond extract.  Really it's a personal choice.

Now, for the instructions.

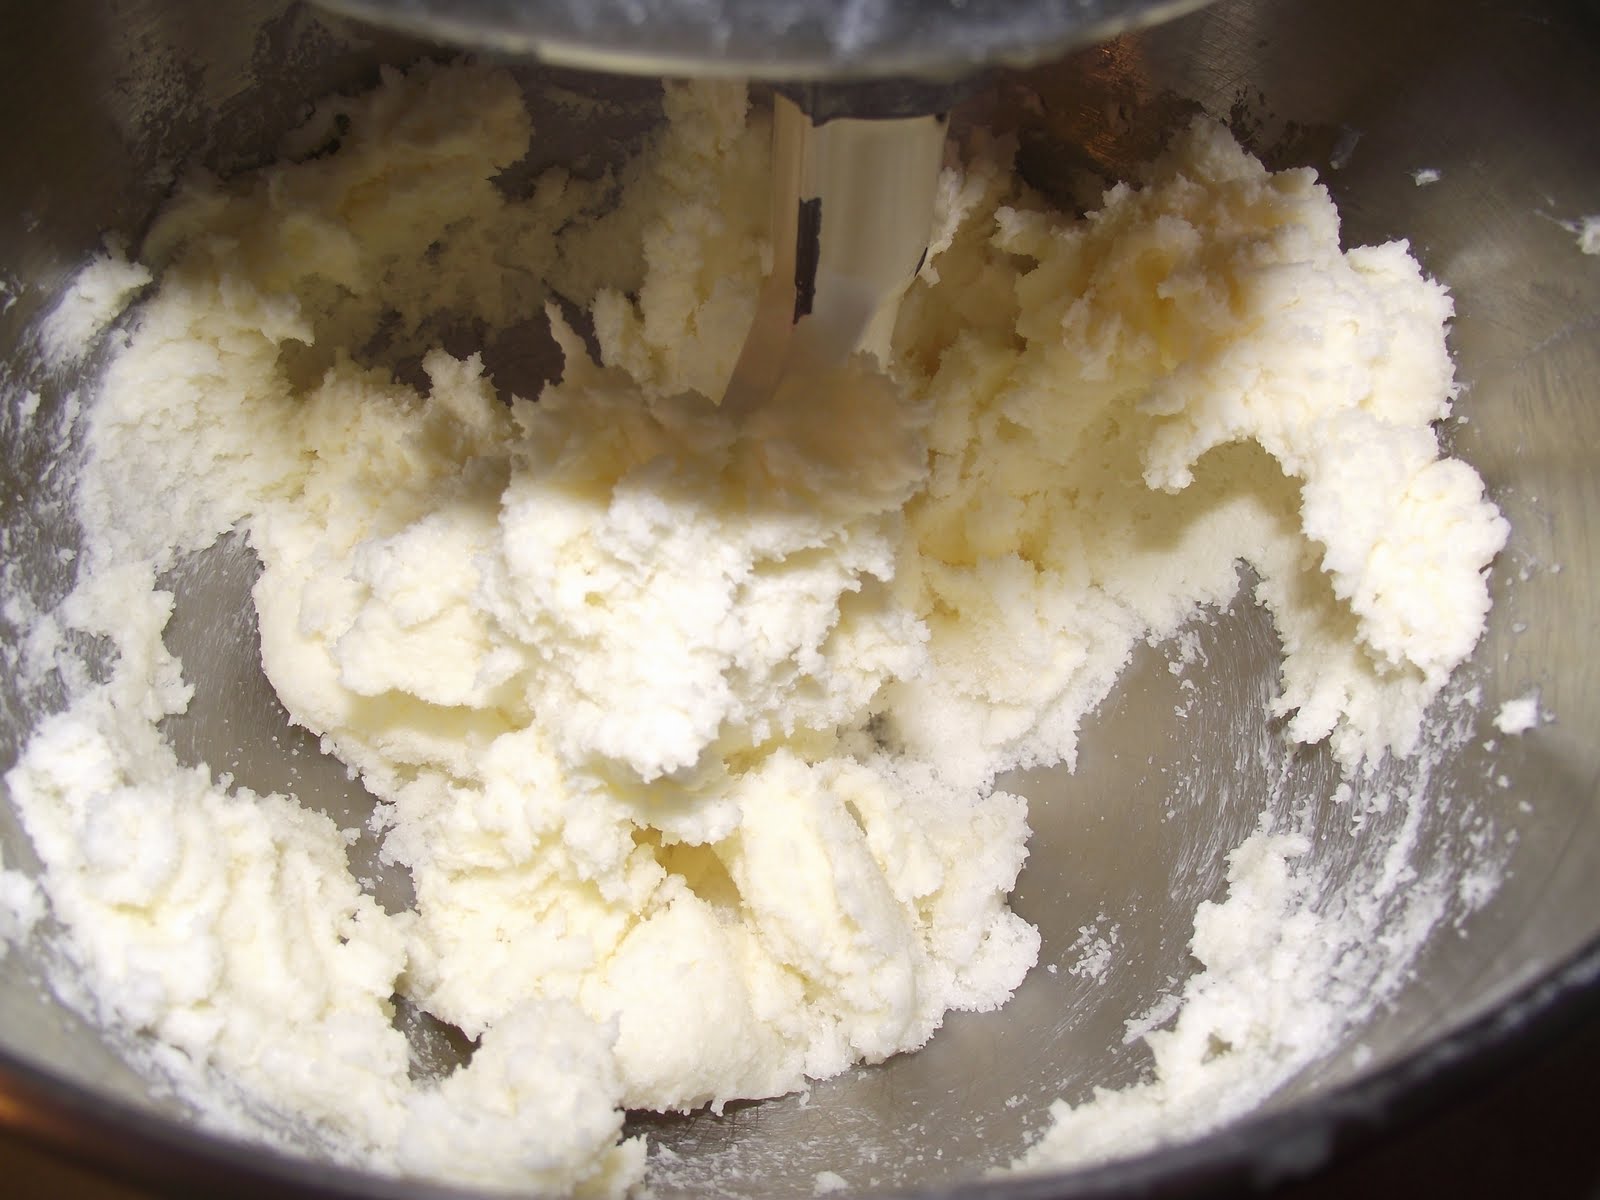
Mix together the butter and sugar until light and fluffy.  This is a big thing.  Most people don't mix them long enough.

This is what it looks like when you start.


The color is a light yellow and it's rather stiff.  For this step it really helps if you have a stand mixer or a really good hand mixer.  Beat it until it's almost white.  It will get much fluffier too.  This takes 3 - 5 minutes with a stand mixer.  This is what it looks like.


It doesn't show up very well, but the color is much lighter and you can easily stir it with a spatula.

Next mix in the eggs and your flavoring, just until combined.  Slowly stir in the flour and baking powder.  The recipe calls for 2 1/2 cups of flour, but I usually end up using about 3 cups.  It helps the cookie keep it's shape when baking and keeps it from spreading.  Cookies made with butter tend to spread.  When you have it all mixed it should look like this.


It will be a little sticky, but should hold together well.  Now put some plastic wrap over the bowl and put it in the fridge for at least 2 hours.

Why?  There are a couple of reasons.  First and foremost it will make the dough easier to handle.  You will have a nice stiff dough that will roll out well without sticking to the rolling pin.  It will cut nicely too.  The other reason is that when the cold butter hits the hot oven, it creates cookie magic.

When your dough has been chilled, take it from the fridge and scoop out what you are going to work with at one time.  Put the rest back in the fridge.  You will have to work it a little bit to loosen it up, kind of like starting a new container of Play Doh.

Dust the cutting board with flour.  Do not use too much and do not use more dough than you can roll out a couple of times.  The more flour you add, the tougher your cookie is going to get.

Next important step - roll out the dough, but not too thin.  No less than 1/4" thick.  You can get bands that go on your rolling pin that let you know when you've reached the desired thickness.  If you roll it too thin, your cookies are going to brown or burn and get crispy.

Cut out as many cookies as you can from your first rolling.


You can take the scraps, make a ball and roll them out again.  I don't go for more than 3 rollings to keep the cookies from getting tough.  After that I mix the scraps into the next batch I'm getting from the fridge.

Place the cookies on parchment lined cookie sheets.  This is not mandatory, but it does make life much easier.  What is parchment paper?  It's a special paper made to go in the oven.  It keeps the cookies from sticking to the tray and the cookies don't stick to the paper.  You find it in the store where you find waxed paper, aluminum foil and all the other goodies.  It saves you from having to use a spatula to get the cookies off the sheet and you have less risk of breaking them.  Simply slide the sheet off the cookie sheet and onto your table or counter to cool.  Life is much easier.

Bake for 8 - 10 minutes at 400 degrees Fahrenheit.  If you put two sheets into the oven, move them halfway through so they bake evenly.  I don't go for the "brown around the edges" because that doesn't give me the soft texture that I want.  They are a little overdone (to me) at that point.  This is what mine look like when they come out of the oven.


Let them cool at least 4 hours, or overnight.  Now you have a nice blank canvas for decorating.  Or you can sprinkle the decorating sugar on before you bake them and just eat them that way.

Enjoy.

Wednesday, August 24, 2011

Baking Gluten Free

On to a happier topic - BAKING!

I absolutely love to bake.  I hate the daily monotony of fixing the family dinner, but give me butter, sugar and eggs and I'll make something.

Lately I have been working on decorated cookies and working on my skills.  There are some great blogs out there that show you techniques and are not shy about sharing what they have learned.  Some of my favorites are SugarBelle'sJP Creatibles and Sweetopia.

I got an order for some gluten free decorated cookies.  They are going to a young woman who I think is wonderful so I was happy to do these for her.


For a while we did a gluten free diet with our son, so I know how to do this.  Many people are finding out they are gluten intolerant, or have Celiac Disease, so this type of baking is becoming more and more popular.  I even had a request for it while I was selling cookies at a Relay for Life event.

There are several things with gluten free.

1) Check ALL your ingredients.  There can be gluten in things like baking powder and vanilla.  Yes, it doesn't belong there, but it's like high fructose corn syrup.  It's in lots of things.  If someone is just gluten intolerant, it may not be as important, but with full blow Celiac, you learn to check and you learn which products you can use and which ones you can't.

2) Gluten free products can be gritty and they tend to be more brittle or crumbly.  There is a good reason for this.  Gluten free products contain no wheat and gluten is found in wheat.  It is the part that makes things more elastic. If you are kneading a loaf of bread and is starts to get that "elastic" feeling, you know you're at the right point for the bread to rise.  This doesn't exist in gluten free baking.  Gluten is the "glue" that holds items such as cakes, cookies and muffins together.

3) Everything you know about regular baking is different.  The biggest thing, and this is related to point  #2, is that you are always told not to over mix or it will become tough or not rise.  It's just the opposite in gluten free.  Beat the crud out of it.  Hopefully you have a nice stand mixer or hand mixer.  You want to go twice as long as a regular recipe, or even longer.  It helps to eliminate that gritty texture.  It also helps to activate the "glue" you add to your recipe.

4) You don't have to use Xanthan Gum!!  This will come as a great relief to anyone who does do GF baking.  This stuff is expensive.  About a year I discovered that you can substitute plain gelatin 2:1 for Xanthan Gum. If a recipe calls for 1 tsp, use 2 tsp of gelatin (such as Knox) in it's powdered form.  It is so much less expensive and serves the same purpose.

I work a wonderful job during the holiday season, and I often spoil the employees by bringing in fresh baked goods.  When I discovered that one of the employees was GF, I made sure to bring things she could eat.  The rest of the employees were skeptical, but soon they were inhaling the GF products and I had to make sure to set some aside for the woman who actually had to eat these. The employees were shocked that the recipes were made differently.

If you are GF, there isn't any reason you can't eat baked goods at home.  Yes, the ingredients are more expensive, but your health is worth it.

I'll leave you with one last photo.  This is one of the things that the employees didn't know was gluten free.  It's a lemon blueberry bread.  Two full loaves of it disappeared!!